Input
SnapNet can automatically use any input axis or action defined in your project settings. Because it is typical to have a number of input axes and actions that are only used for non-networked gameplay like navigating menus, SnapNet does not network all of your input axes and actions by default and those you want to synchronize must be explicitly specified.
Configuration
You can configure the inputs available to your SnapNet simulation by opening the editor, navigating to Edit → Project Settings → Plugins → SnapNet, and expanding the Common → Input section. The names of your input axes and actions must match those specified in Project Settings → Engine → Input.
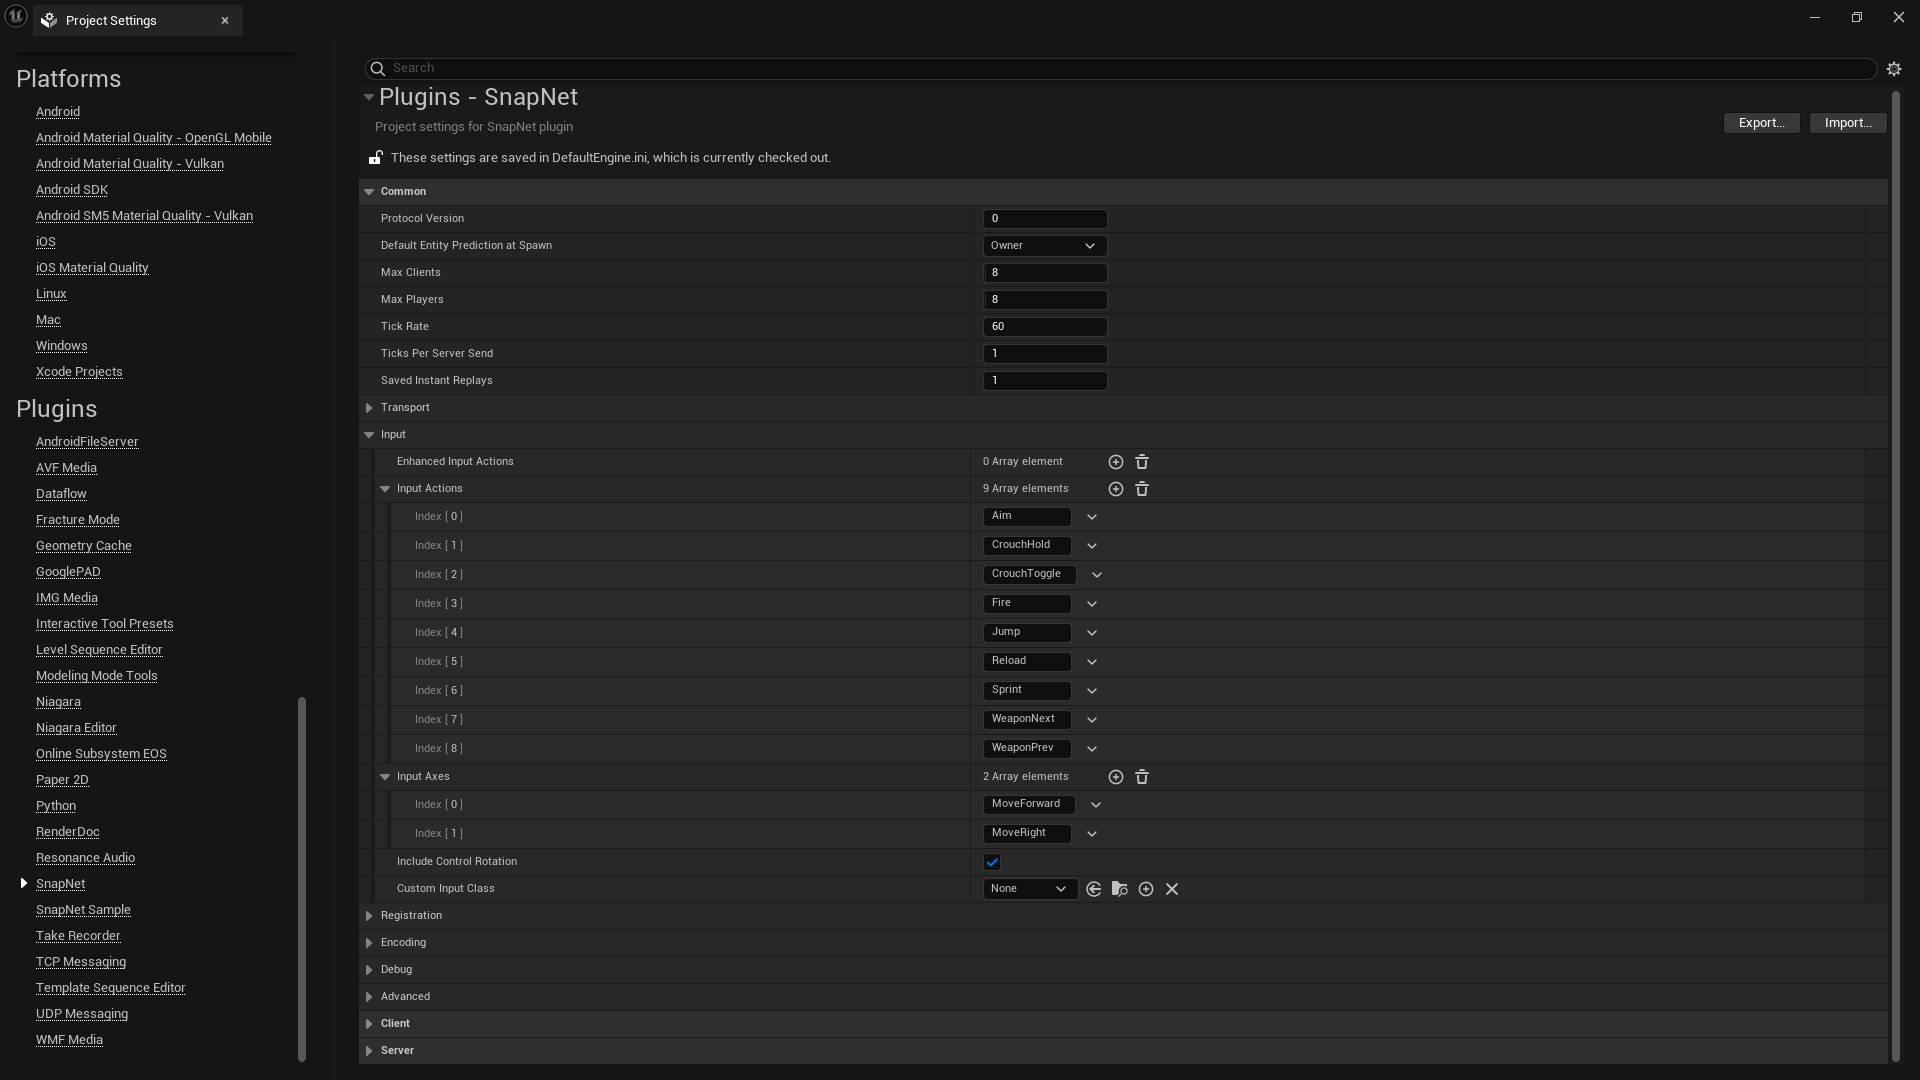
You can also check Include Control Rotation to make the Control Rotation from each player’s local player controller available as an input to the simulation which is commonly used for first-person and follow cameras.
Accessing Player Input
Player input can be accessed directly from the SnapNet Simulation object. Typically, you will be retrieving input from within an entity’s tick function:
void AExampleEntity::Tick( float DeltaSeconds )
{
    if ( USnapNetSimulation* Simulation = EntityComponent->GetSimulation() )
    {
        const int32 PlayerIndex = EntityComponent->GetOwnerPlayerIndex();

        const float MoveForwardValue = Simulation->GetInputAxis( PlayerIndex, "MoveForward" );

        const bool bIsJumpHeld = Simulation->IsInputActionDown( PlayerIndex, "Jump" );

        const bool bWasJumpPressed = Simulation->WasInputActionPressed( PlayerIndex, "Jump" );

        const bool bWasJumpReleased = Simulation->WasInputActionReleased( PlayerIndex, "Jump" );
    }
}
Note that SnapNet automatically tracks both the current and previous inputs so that you can directly query whether an action was pressed or released without the need to track that state manually.
Enhanced Input
In addition to the legacy input system, SnapNet also supports the Enhanced Input plugin from Epic Games.
Warning
We do not recommend using Input Triggers for networked input actions. There are a couple of reasons for this:
-
Since the logic for an input trigger is performed exclusively by the client, it introduces additional attack vectors for cheaters. Consider an action that requires a button to be held for one second before triggering. If this is implemented via an Input Trigger, the client could be trivially modified to perform the action immediately without waiting for that delay of one second. This could give cheaters a significant advantage compared to other players. Instead, the simulation code should store the time at which the button was first pressed using a networked property and only activate the ability if one second has passed. This approach maintains server authority and does not give the client any way to circumvent the intended delay.
-
If a network interruption occurs and a player’s input does not arrive to the server on time, the server will advance assuming the player’s input remains unchanged. Consider the same action as above, one that requires a button to be held for one second before triggering. If this is implemented using an Input Trigger, the button will only be activated for a single frame of input after being held for one second. If that single input arrives late, the action will never be performed on the server. Instead, if the simulation code tracks how long the input has been held, the action will be performed as expected even if that last frame of input doesn’t arrive in time.
Configuring Enhanced Input
Enhanced input actions can be registered with SnapNet by navigating to Edit → Project Settings → Plugins → SnapNet, expanding the Common → Input section, and registering UInputAction assets under the Enhanced Input Actions property. Input Mapping Contexts are not networked; each client is responsible for applying Input Mapping Contexts to their own ULocalPlayers based on the state of the game. A single Input Mapping Context applied at game start is often sufficient.
Accessing Enhanced Input
Once registered, the values corresponding to Enhanced Input actions can be accessed directly from the SnapNet Simulation object:
void AExampleEntity::Tick( float DeltaSeconds )
{
    if ( USnapNetSimulation* Simulation = EntityComponent->GetSimulation() )
    {
        const int32 PlayerIndex = EntityComponent->GetOwnerPlayerIndex();

        const FVector2D MoveValue = Simulation->GetEnhancedInputActionValue<FVector2D>( PlayerIndex, MoveAction );

        const bool bIsJumpHeld = Simulation->GetEnhancedInputActionValue<bool>( PlayerIndex, JumpAction );

        const bool bWasJumpPressed = Simulation->WasEnhancedInputActionPressed( PlayerIndex, JumpAction );

        const bool bWasJumpReleased = Simulation->WasEnhancedInputActionReleased( PlayerIndex, JumpAction );
    }
}
Custom Input
For use-cases that don’t fit neatly into the legacy axes/actions or Enhanced Input paradigms, SnapNet supports completely custom input.
Warning
Use caution when deciding what you consider input, as it comes directly from the client and could be manipulated by cheaters. For example, sending whether or not you’re pushing the “forward” key has limited usefulness to cheaters. On the other hand, sending the position of your character as part of your input would allow cheaters to teleport anywhere they want if they were to modify it.Configuring Custom Input
To implement custom input, first subclass USnapNetCustomInput. The following example traces the cursor into the world and then syncs that 3D world position as part of the player’s input.
#pragma once

#include "SnapNetCustomInput.h"
#include "SnapNetPropertyVector.h"

#include "MyCustomInput.generated.h"

UCLASS()
class UMyCustomInput : public USnapNetCustomInput
{
    GENERATED_BODY()

public:
    FORCEINLINE FVector GetCursorPosition() const { return CursorPosition.GetValue(); }

    virtual void Populate( class APlayerController* LocalPlayerController ) override;

protected:
    UPROPERTY()
    FSnapNetPropertyPosition CursorPosition;
};
#include "MyCustomInput.h"

#include "GameFramework/PlayerController.h"

void UMyCustomInput::Populate( APlayerController* LocalPlayerController )
{
    FHitResult HitResult;
    if ( LocalPlayerController->GetHitResultUnderCursorByChannel( UEngineTypes::ConvertToTraceType( ECC_Visibility ), true, HitResult ) )
    {
        CursorPosition.SetValue( HitResult.ImpactPoint );
    }
}
Then, configure UMyCustomInput as your custom input class in the editor via Edit → Project Settings → SnapNet → Common → Input → Custom Input Class.
Accessing Custom Input
Like other input, custom input can be retrieved directly from the simulation:
void AExampleEntity::Tick( float DeltaSeconds )
{
    if ( USnapNetSimulation* Simulation = EntityComponent->GetSimulation() )
    {
        const int32 PlayerIndex = EntityComponent->GetOwnerPlayerIndex();

        if ( const UMyCustomInput* MyCustomInput = Simulation->GetCustomInput<UMyCustomInput>( PlayerIndex ) )
        {
            const FVector CursorPosition = MyCustomInput->GetCursorPosition();
        }
    }
}